Multi-Factor Authentication (MFA) or sometimes called two-step verification, is an advanced security layer included with Office 365 that makes it more difficult for hackers to get access and gain control of your account.
Make sure to set up more than one MFA method.
In order to avoid relying on the same device for authentication, you should add multiple methods. This also helps to login when your device is lost or stolen.
Video Guidance
Microsoft have created the below video guide to walk you through each step of the setup process for MFA. If you are having issues with setting up MFA, please take a look at this video:
How to set up MFA on your account
Step 1
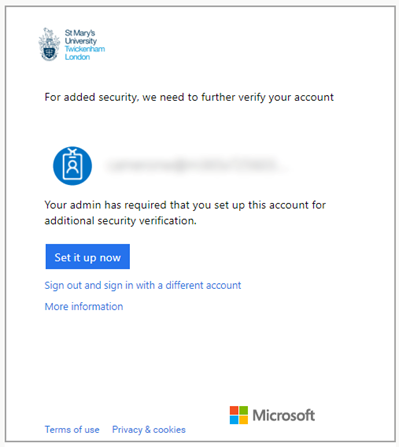
Log in to your Office 365 account. Your first login after MFA has been enabled will require you to setup your additional identity verification methods. To continue click the Set it up now button.
Step 2
On your mobile device, download and install the Microsoft Authenticator app.
Download for Android
Download for iOS
Step 3
Select Mobile App from the drop down list and select Receive notifications for verification.
(You can also choose Authentication Phone if you would like to receive SMS requests. Please see below for guidance on setting up the Authentication Phone option.)

Step 4
Click Set up. On your phone or tablet, open the Authenticator app and click Add an account.
When prompted for the type of account you want to add, select Work or School Account
Step 5
Scan the QR code that is displayed on your monitor using your phone's camera. You may need to allow the Microsoft Authenticator app to access your camera if prompted.
Step 6
Tap Finish in the mobile app and you should now see a 6 digit code displayed.
Go back to where the QR code is being displayed and click Next. It will ask you to enter the 6 digit code from your phone. Enter the code and click Verify.
Step 7
You will be asked to enter your mobile number as a backup method in case you lose access to the app. Enter your mobile number and click Next.
- Log into https://mysignins.microsoft.com/
- Click on your user picture or initials on the top right corner and click View Account.
- Click on Security Info from the left-hand side of your account area.
- Select the + Add sign-in method
- Choose your alternative method and enter the details.
Methods include:
- Up to two mobile numbers.
- Two Authenticators including Microsoft Authentication App, Authy Authentication App, Google Authenticator.
- A Work phone or home phone.
Next time you logon and you want to use the alternative method select I can't use this right now and a choice will come up for you to choose from.
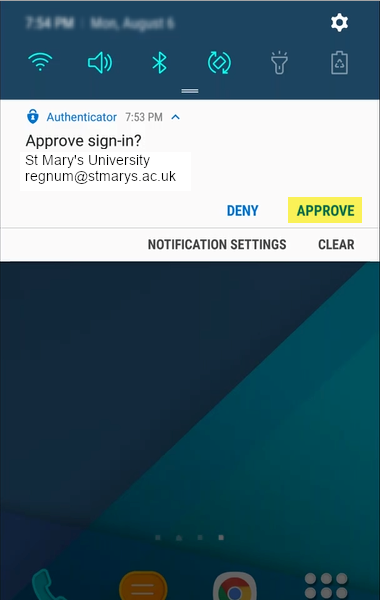
- Log in to an Office 365 website or app.
- The next screen will notify you that a notification has been sent to your mobile device to approve your sign-in.
- On your mobile device, a notification will appear in the notification panel from the Microsoft Authenticator app asking you to approve the sign-in. Select Approve.
- You have now successfully signed into your account.
You can change your verification methods whenever you like as long as you have access to your account.
- Log into Office 365 by clicking the button below:
Launch Office 365 (Email)
- Click on your user picture or initials on the top right corner, and click View Account.
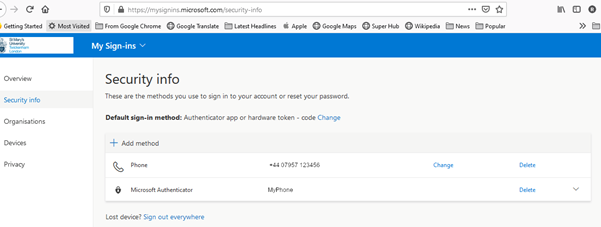
- Click on Security Info from the left hand side of your account area.
- You will see your authentication methods listed. For each one, you can click Change or Delete. You can also add a new method using the Add method button at the top.
- Log into Office 365
- Click on your user picture or initials on the top right corner and click View Account.
- Click on Security Info from the left-hand side of your account area.
- Go to the method you wish to delete and click the delete button next to it.
- If you delete the default sing-in method, next time you sign in the method you use will automatically become the new default method.
- If you can use the alternative MFA method login using that method.
- Delete the lost or stolen device.
- Click the sign out everywhere
- Set up a new MFA device.
If you are unable to use an alternative MFA method, please contact the IT Helpdesk
- Use a different browser for each of your Microsoft profiles, such as Chrome, Edge, or Firefox
- Use a private / incognito window to login.
- Sign out and then clear cookies - if you have only one browser with no private / incognito capabilities.
- Ensure you have the authentication app rather than relying on a call or SMS
- Ensure you have internet access if you need it to authenticate.
- Moodle now uses Microsoft365 for authentication.
- External Examiners will need to login to office.com with your university login xxxx@stmarys.ac.uk and your password.
- On first logon, examiners will be prompted to set up MFA so will need a mobile phone to hand.
- Once logged in to Office365 and registered for MFA, an examiner can login to Moodle as before.
- If a user goes straight to Moodle without registering for MFA at mysignins.microsoft.com a password error will appear.
- The following image will appear for resetting your password if you do not have an alternative method setup.
- You will need to use another email address that’s not your St Mary's email, or a mobile number.
