Here are the top 5 queries for St Mary's University. Look below for guidance on how to solve common issues and errors.
Change your password
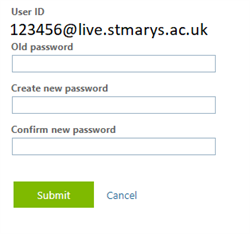
Students are recommended to change their password every 90 days. If you can currently login and access your account and you have been requested to change your password, please use the link below:
https://account.activedirectory.windowsazure.com/ChangePassword.aspx
If you cannot login to your account please skip to the 'Forgotten Password / Locked out of account' section below.
Make sure that you are already logged in to your St Mary's Office 365 account via https://www.office.com/signin before you make any changes.
Locked out of account / Forgotten Password
If you have forgotten your password or you are locked out of your account eg. if you missed the deadline to reset your password or due to entering the password wrong too many times. Please use the link below:
https://passwordreset.microsoftonline.com/passwordreset#!/
Then it will redirect you to a page which will allow you to reset your password and unlock your account.
Locked out of Account Guidance
If you are locked out of your account:
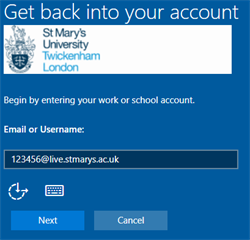
- Visit https://passwordreset.microsoftonline.com/passwordreset#!/
- Enter your your regnum@live.stmarys.ac.uk (123456@live.stmarys.ac.uk)
- Click Next
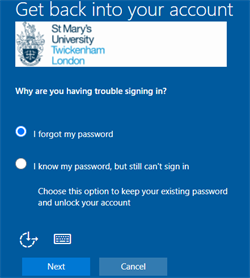
- Select 'I know my password, but still can't sign in' this allows you to keep your existing password and unlock your account
Forgotten Password Guidance
If you have forgotten your password:
- Visit https://passwordreset.microsoftonline.com/passwordreset#!/
- Enter your your regnum@live.stmarys.ac.uk if you are a Student, or regnum@stmarys.ac.uk if you are Staff member. (12345@stmarys.ac.uk)
- Click Next
- Select 'I forgot my password'
- Choose a contact method for verification that you have available
- Then follow the instructions.
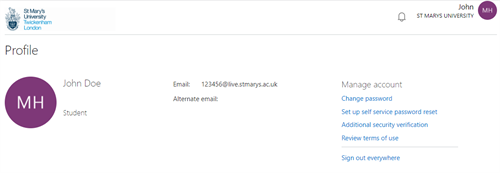
Check your Profile
You can also check your profile, where you can change your password, change / add methods for multifactor authentication etc. via:
https://account.activedirectory.windowsazure.com/r/#/profile
Eduroam
Eduroam is a shared Wi-Fi service enabling St Mary's students and staff to connect to Wi-Fi on both the St Mary's campus and at other universities. This service is free of charge and will work with most Wi-Fi enabled devices, including laptops, smartphones and tablets.
Please be aware that your username for the eduroam service is: REGNUM@live.stmarys.ac.uk.
How to connect to Eduroam
- Make sure Wi-Fi is switched on your device and scan for new networks
- If the university you are at supports the service, you should see a network called Eduroam appear on the screen
- Select the Eduroam network from the list.
- When prompted, enter the following login details:
- For username, enter REGNUM@live.stmarys.ac.uk (e.g. 123456@live.stmarys.ac.uk)
- For password, enter your usual St Mary's IT password
- Continue Connecting will appear, click Connect
- Your device will usually remember the login settings above and in most cases will automatically connect to Eduroam Wi-Fi at any university to provides this service.
If your password has changed
When you change your university account password you will need to set up Eduroam Wi-Fi on your personal devices again.
To reconnect to Eduroam Wi-Fi you will first need to remove/forget the Eduroam network on your laptop or device:
- Go to the Settings application on your device
- Open the Wi-Fi option
- Select Eduroam and choose "forget"
- You can now re-connect to Eduroam
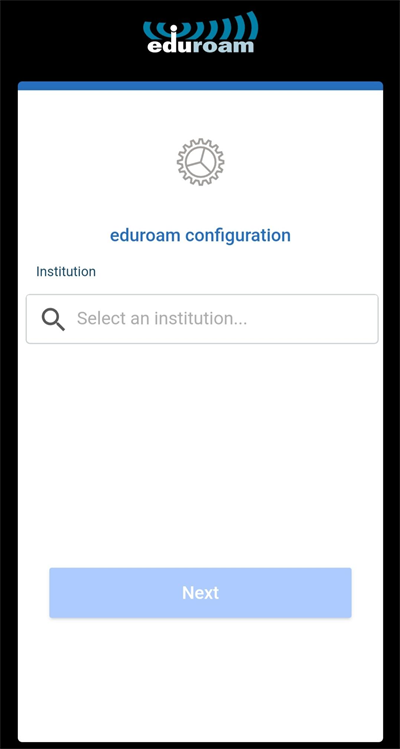
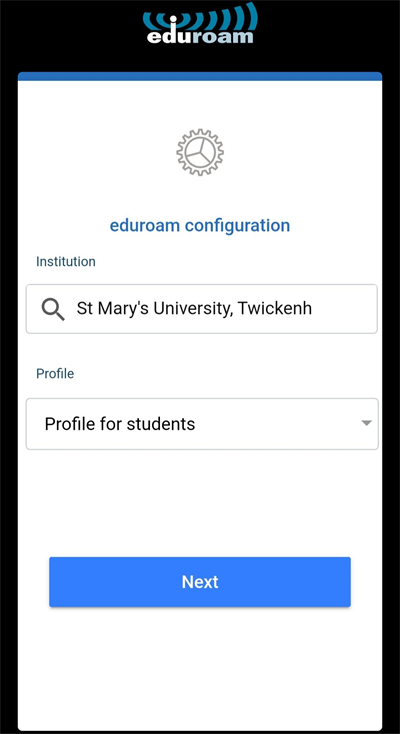
Setting Up Eduroam for Android
-
- Download the geteduroam app from Google Play Store and install the geteduroam app

- Once downloaded click to open
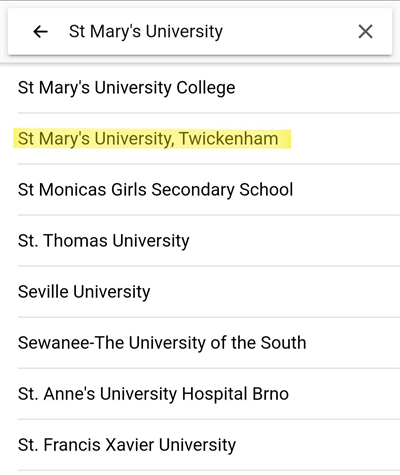
- Click "Select an institution"
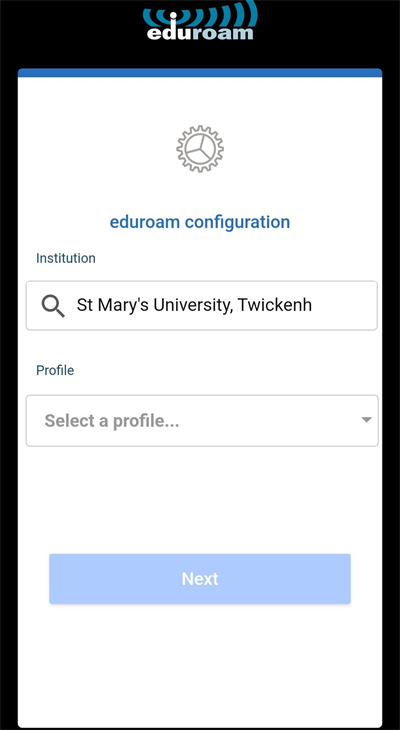
- Type St Mary's University then select St Mary's University Twickenham
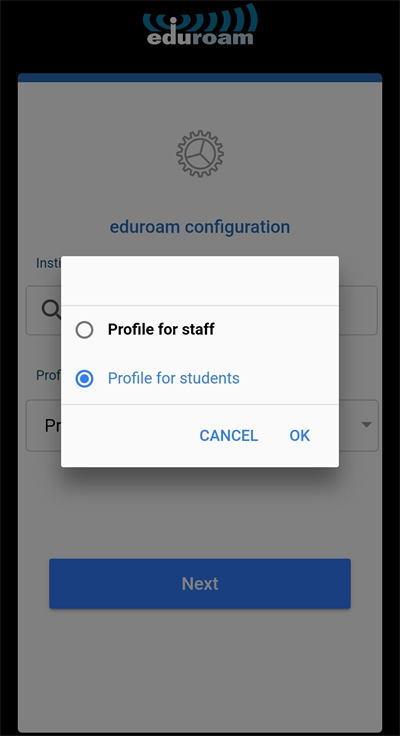
- Click "Select a profile..."
- Select the profile for staff, then "ok"
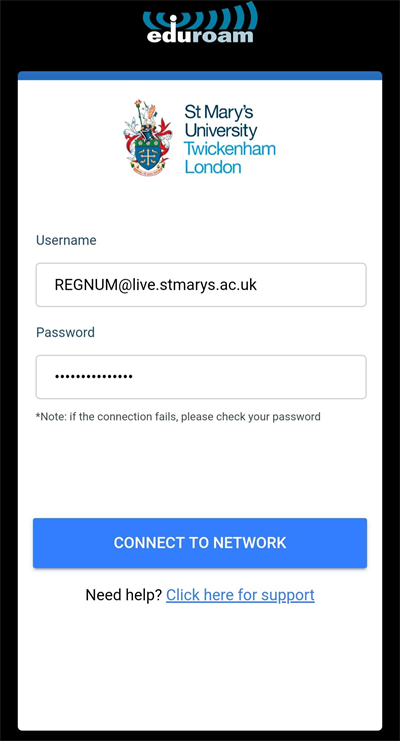
- Enter your username e.g. REGNUM@stmarys.ac.uk and password and click "CONNECT TO NETWORK"
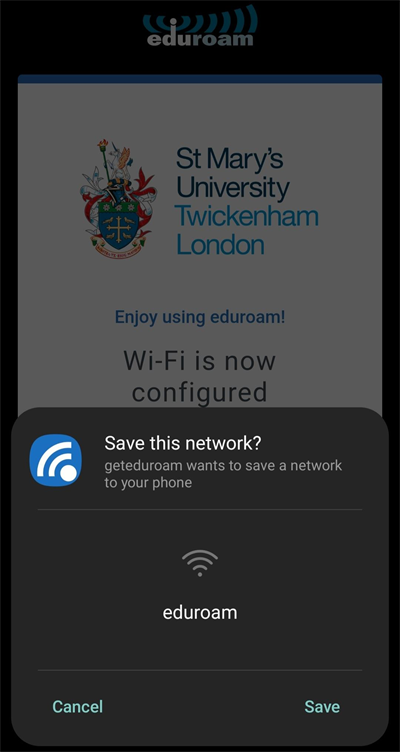
- Click "save" to save the network to your phone
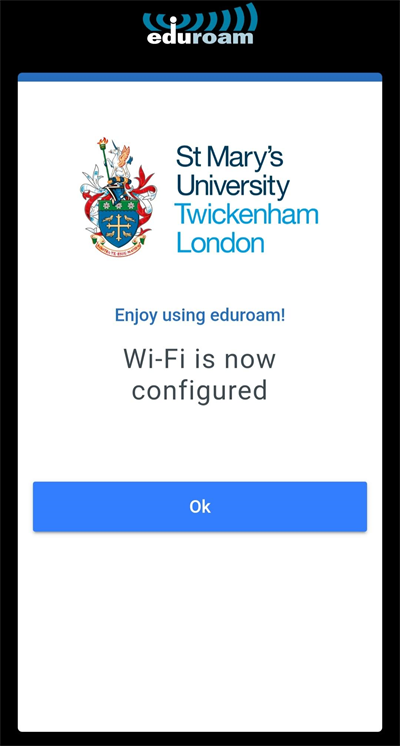
If your password remains the same, you will automatically be connected to eduroam whenever you are on campus. If you reset your password, you will need to repeat this process.
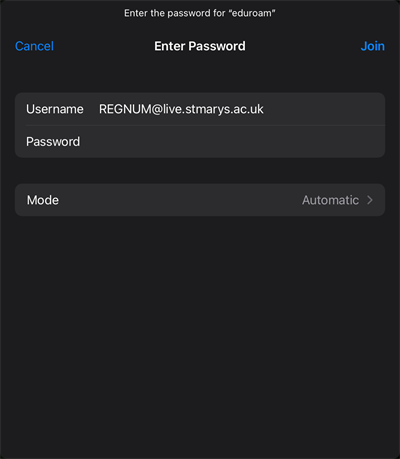
Setting Up Eduroam for Apple
- Go to settings on the Apple device then Wi-Fi
- Select eduroam
- Enter your username e.g. REGNUM@live.stmarys.ac.uk and password and click "Join"
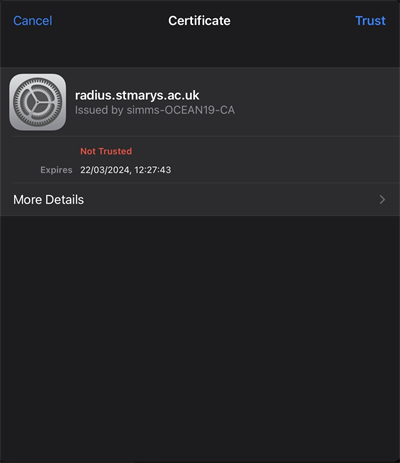
- A Certificate box will appear click "Trust"
- You will see connected to eduroam
If your password remains the same, you will automatically be connected to eduroam whenever you are on campus. If you reset your password, you will need to repeat this process.
Office 365
Installing and Logging in to the Office Suite
If you already have Office installed on your device please follow the step 'How to uninstall older versions of Office' below
.
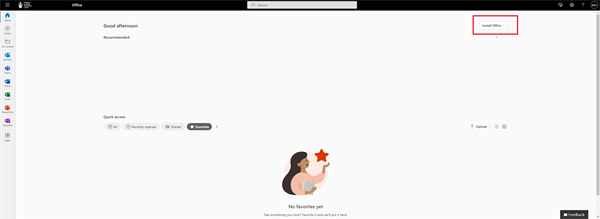
Log in to the Office website with your regnum@live.stmarys.ac.uk (staff - username@stmarys.ac.uk)
You will see icons for each Office 365 app available. Above these to the top right there is an "Install Office" button.
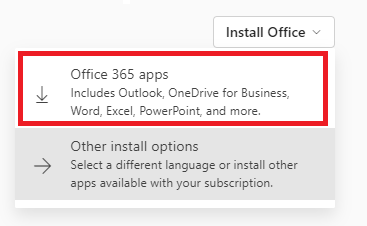
Click "Office 365 Apps" to download the version for your operating system. Click "Other install options" to see all available operating system versions.
Note - Your access will end once you have graduated / left the university.
Uninstalling Older Versions of Office
Windows:
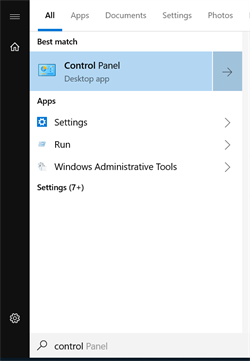
Click the start menu in the bottom left hand corner of your screen, type control panel, then select Control Panel.
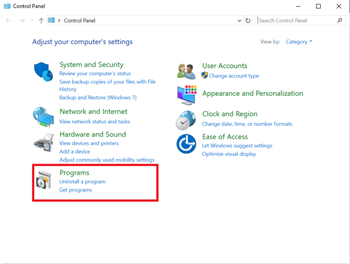
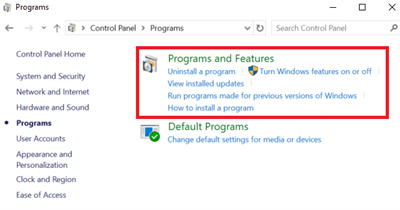
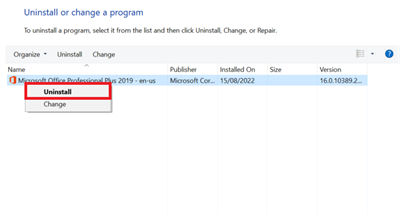
Select Programs > Programs and Features, then right-click your Microsoft Office product, and choose Uninstall.
Mac:
Open Finder > Applications.
Select all of the Office for Mac applications.
Right click the applications and click Move to Trash.
Replacing an expired Office 365 license with your university license
On the device where you want to change the license, open any Office app, select the File menu and then select Office Account near the bottom of the menu.
Under Product Information, select the Change License button (If there is no Change License button, you may need to install Office updates).
If you're signed in, select Use a different account, and then sign in with your St Mary's email account instead. If you're not signed in, sign in with your St Mary's email account.

SPSS
SPSS (Statistical Package for the Social Sciences) is a software package for running statistical analysis on research results. You will often need to use SPSS if you need to analyse quantitative research data as part of your assignments or dissertation. SPSS is available on most open access PCs on the St Mary's campus. You can also install SPSS on your own computer to use it at home by following the instructions below.
Installing SPSS on your own computer
Important note: by downloading the SPSS installation file you are agreeing to the terms of the SPSS Licence and Copyright Agreement. Please read this agreement before downloading the software.
How to install
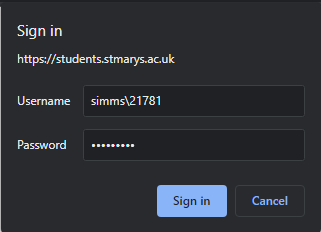
Log in to https://students.stmarys.ac.uk/htcomnet using your regnum/password.
Note - You will need to type simms\ before your username, e.g. simms\123123
Select the version of SPSS you wish to use and download the EXE or DMG file to match your operating system.
Run the file and follow the on-screen prompts to install the software.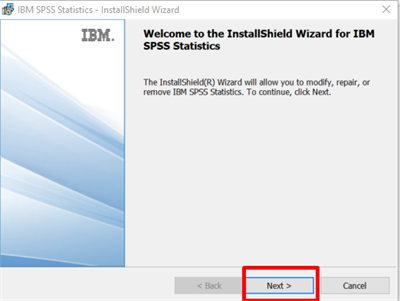
When prompted to enter a license key, select the “Authorized user license” option and click next.
Input the license key that is found inside the same folder as the SPSS installer at https://students.stmarys.ac.uk/htcomnet/
Important note regarding SPSS licence codes
Please do not under any circumstances pass SPSS licence codes to other students or anyone else outside of St Mary's. Doing so will breach our Licence Agreement and may mean that we lose access to the software.
Relicensing SPSS
If you already have a St Mary's copy of SPSS installed on your computer, you will need to re-licence the software each December to continue using it. This does not require you to reinstall the software, but you will need to enter the new Licence Code once this is available.
To relicense:
- Make sure you are connected to the internet
- Launch the SPSS License Activation Wizard from the Start Menu / Applications folder
- On the Product Authorization page, select “Authorized user license” and click next.
- Enter the license key found within the same folder as the installation files for SPSS at https://students.stmarys.ac.uk/htcomnet/
- You should receive an "Authorization succeeded" message. Click Finish. Important note regarding SPSS licence codes
Please do not under any circumstances pass SPSS licence codes to other students or anyone else outside of St Mary's. Doing so will breach our Licence Agreement and may mean that we lose access to the software.
SPSS Help and Guidance
Basic Introduction to SPSS
We recommend that students read through this helpful Open University module to get a basic introduction to using SPSS.
Advanced Training on SPSS
If you are required to use SPSS then your degree course will include training sessions on using the software. Please ask your lecturer if you need further assistance.
Nvivo
Nvivo 12 is a qualitative data analysis software package designed for qualitative researchers who need to analyse text-based and/or multimedia information. This software can be downloaded for free by St Mary's staff and students. Please follow the instructions below to first download, and then license the software.
Installing NVivo
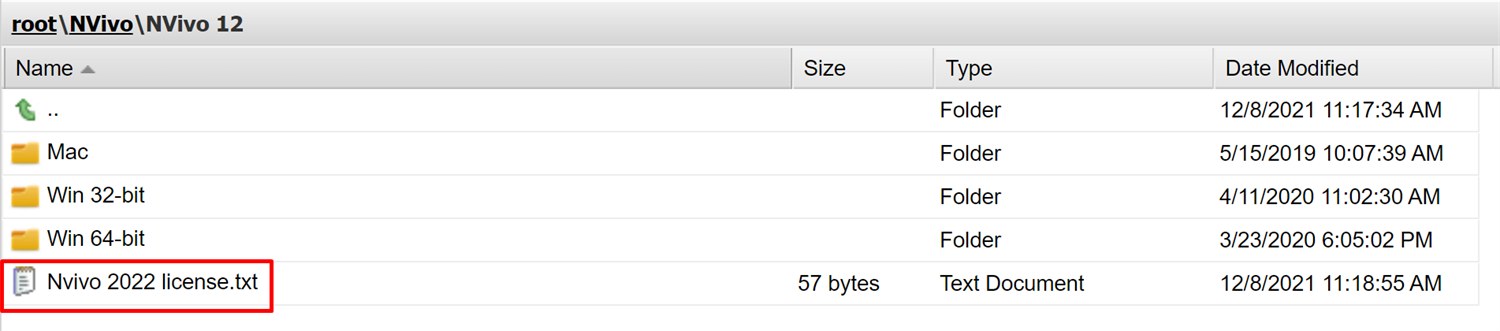
- Navigate to https://students.stmarys.ac.uk/htcomnet/ and log in using your University login details. Note - You will need to type simms\ before your username, e.g. simms\123123
- Once logged in, click the NVivo folder on the left hand panel, and then download the EXE or DMG file for your operating system.
- Note - there is a 32-bit and 64-bit version of the windows EXE file. Most computers will use the 64-bit version so download this one first.
- Run the file and follow the on-screen instructions. If the software prompts you to install extra components / software, choose to do so.
Licensing NVivo
- Launch NVivo from the Start Menu (Windows) or Applications folder (Mac)..
- A licensing wizard will open. Input the license key that is found inside the same folder as the NVivo installer at https://students.stmarys.ac.uk/htcomnet/
- The software will then require some details about who is using the software. Only the fields with asterisks are required.
- Once details are added, you will get a popup stating “Your license has now been activated”.
Important note regarding NVivo licence codes
Please do not under any circumstances pass NVivo licence codes to other students or anyone else outside of St Mary's. Doing so will breach our License Agreement and may mean that we lose access to the software.
Other Available Software.
Software available on all PCs on campus.
- 7-Zip
- Adobe Reader DC
- Dameware Mini Client
- Google Chrome IBM SPSS Statistics
- Microsoft Edge
- Microsoft Office 2019
- NVivo
- Trend ApexOne Antivirus
- VLC Media Player
Additional Sodtware Available on Student Open Access PCs
- Adobe Digital Editions
- Audacity
- Mendeley Reference Manager
- Mindview
- R Programming Language
- R Studio
- Refworks Citation Manager (available from Word add-in store)
- Refworks RefGrab-It
- Texthelp Read & Write
Specialist software available on M-Block PCs (also includes Student Open Access software listed above)
- E-Prime 2
- Data Harvest EasySense
- Flowol 4
- G*Power
- Inkscape
- Kodu Game Lab
- Mr Bit Microbit
- Openboard
- OpenSCAD
- Physlets Tracker
- Python 3
- Review Manager 5 (RevMan)
- Safe Exam Browser
- Scratch Link
- SMART Notebook Basic
- Sonic Pi
- Thonny
- Pyhton IDE
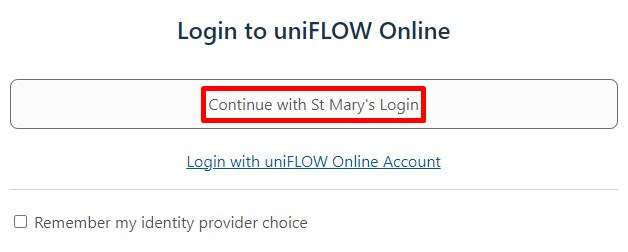
- To activate your uniFLOW online account visit : https://stmarys.uk.uniflowonline.com/
- Login with your St Mary's Login e.g 12345@stmarys.ac.uk
- Once logged in, you will receive an email from noreply@stmarys.uk.uniflowonline.com with a ‘Temporary Identification Code’ (TIC). Keep this code in a safe place as you will need it to logon to printers and register your card. If you do not receive this email, please check your ‘Junk’ folder. If the email is still not present, please visit The Hub Online.
- This will take you to your personal online account for Canon uniFLOW, which will look as follows.
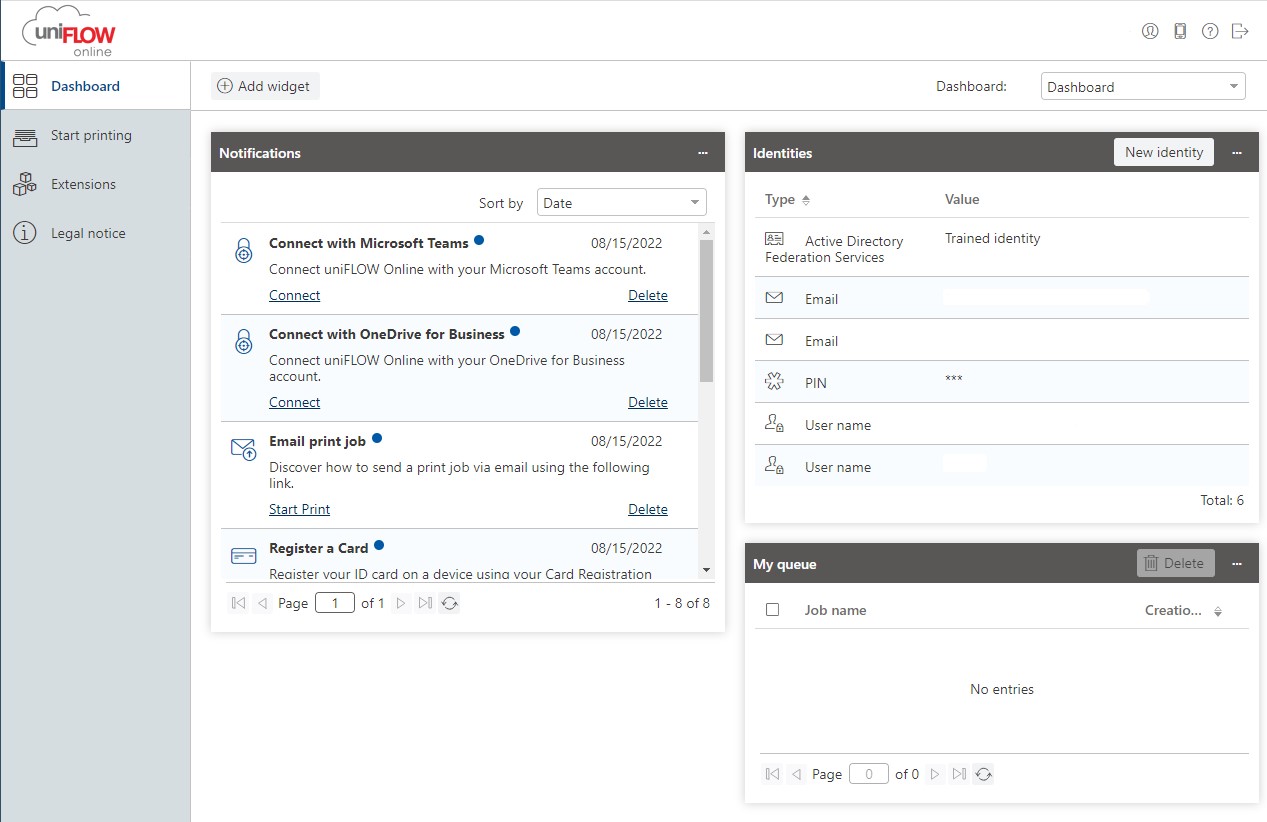
- Within the Uniflow dashboard you can also connect your account with Microsoft Teams, OneDrive, see previous print jobs, the print queue and top up your budget. Once you are done, you can close this window and you will be connected. if you need to access your uniFLOW account again. you can do so via this link: https://stmarys.uk.uniflowonline.com/
The following guidance applies when using a PC/laptop provisioned by St Mary’s and connected to GlobalProtect VPN or via an Ethernet cable.
The printer software has been pre-installed on your laptop/PC and should connect the uniFLOW Online cloud at login. You may be asked for MFA approval once you have logged into your laptop/PC if you are not connected to the network via ‘GlobalProtect VPN’ or via an Ethernet cable.
Printing from an application (e.g., Word, Excel, etc.)
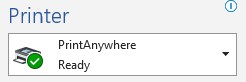
When printing select the printer ‘PrintAnywhere’, which will appear as shown below. Print and collect the print out from the Canon printer.
Emailing a file to the printer
Alternatively, you can email documents for printing to mobileprint@stmarys.uk.uniflowonline.com from a St Mary’s University email account. This will replace the mobileprint@stmarys.ac.uk email address.
Download and install the ‘uniFLOW Online Print & Scan’ from the manager app.

- Open the app on your mobile device.

- Select ‘Next’ to get past the Welcome message, then select ‘Manual login’.
- Enter ‘stmarys.uk.uniflowonline.com’ when prompted for a “tenant URL” and click next.
- Select ‘St Mary’s Login
- You will then see “All Done”, or the uniFLOW dashboard, in your internet browser your registration is complete.
- Next, return to the uniFLOW App which will display your Dashboard.
- You can now print from the Mobile App to Canon printers/MFDs as follows: Select ‘Print’.
If you are going to do regular printing from your Mac Book, you can Download and install the macOS printer driver by visiting: https://stmarys.uk.uniflowonline.com/
- Once logged in click on ‘Start printing’ and on the right-hand side download the ‘macOS printer driver’.

- Once installed, you will see ‘PrintAnywhere’ as an available printer when printing. Use this printer and then go the printer and present your card to the printer’s touch pad.
Before printing and scanning you must register your card.
- Go the printer and present your card to the printer’s touch pad.
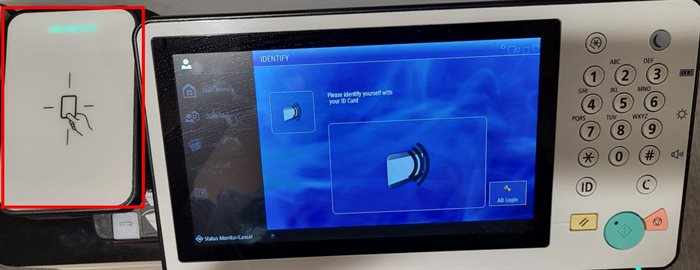
- When prompted for ‘…your Temporary Code (TIC)’, enter the code emailed to you when you activated your uniFLOW online account. pdesk for support.
- If you entered the correct code, your card is now registered to your account, and you will see a screen as below. You just need to use your card in the future to log into the printer, not the code.
- If you face any issues, please contact the Helpdesk for support