St Mary's provides all staff and students with access to Office 365, including a mailbox via Outlook.
We do not recommend auto-forwarding email from your St Mary's account to another account. Forwarded emails may be blocked by spam filters or be directed to junk folders in your personal email account. Your St Mary's email should be used for University correspondence wherever possible.
Please do not sign up for any services using your St Mary's account. Access to these will be lost once your account has been deactivated.
Launch Office 365 (Email)
To access your Office 365 account from anywhere in the world, you need to log into the Microsoft Office 365 web portal. You can do this on any device with a web browser:
- Navigate to the Office 365 website or click the button above.
- This will take you to a Sign In page. Enter your email address in the below format:
- Students - regnum@live.stmarys.ac.uk
- Staff - username@stmarys.ac.uk
- This will take you to a login page with a picture of the St Mary's University chapel. Please enter your password here and click Sign In
- This will take you to your Office 365 dashboard showing your available applications such as Word, Excel, PowerPoint.
- To access your mailbox, click on the Outlook button.
The most common apps for email are the built-in iOS Mail app and Android Mail app. Please see below for guidance on setting up these apps on your phone / tablet. If you are using a third-party mail app, please check for guidance from the developer/publisher of the app.
- Go to your device's Settings
- Go to Passwords & Accounts and select Add Account.
- From the list of email provider options, select Exchange
- When prompted for an email address, enter:
- Students - regnum@live.stmarys.ac.uk
- Staff - username@stmarys.ac.uk
- You can change the Description text field to St Marys to make it easier to identify the mailbox.
- A dialog box will pop up. Click Sign In.
- You should be redirected to a St Mary's login page. Enter your password and click Sign in.
- A dialog box will appear allowing you to select what you want to sync. We recommend disabling the Contacts option so you do not sync your device contacts to your university account.
- Open the Mail App and navigate to Settings.
- Click Add Account. From the options, select Exchange
- When prompted for an email address, enter:
- Students - regnum@live.stmarys.ac.uk
- Staff - username@stmarys.ac.uk
- Enter your Password and click next.
- If an Email Setup prompt appears, enter the server as outlook.office365.com and click next.
- In order to have your email on your device, you need to have a passcode for security reasons. The Office 365 service will ask for permissions on your device. If these are not granted then you will not be able to add your mailbox.
- Select which parts of your mailbox you wish to sync. We recommend email and calendar only.
- Once completed, your email will start to download into your Mail application.
- Login to Office 365 and select Outlook
- In the top right, click on your initials, then click on "Open another mailbox".
- You will see a pop-up box. In this box, enter the email address of the mailbox you want to open and click open.
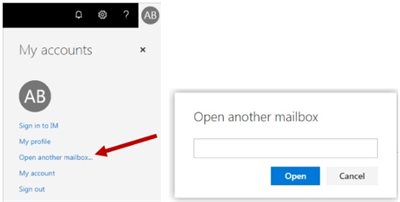
- This will open the mailbox in a new tab in your web browser. You will need to do this each time you want to access the mailbox, or add the mailbox to your bookmarks for quick access.
- Login to Office 365 and select Outlook
- Go to the Calendars tab in the bottom right of the Outlook window
- Click the Import Calendar button on the left hand side of the calendar window

- In the window that pops up, select the From directory option from the left hand menu, and then search for the email address/calendar name in the Select a person, group or resource section.
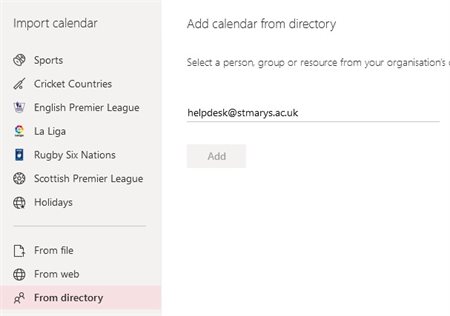
- Click the "Add" button. The calendar should now appear in the People's calendars section on the left hand side of the calendar window.
- Follow the guide to access the shared mailbox above.
- At the top of the page, select Settings
 > View all Outlook settings > Mail > Automatic replies.
- Select the Turn on automatic replies toggle.
- Select the Send replies only during a time period check box, and then enter a start and end time.
- If you don't set a time period, your automatic reply remains on until you turn it off by selecting the Automatic replies on toggle.
The St Mary's student email service is provided by Microsoft and is subject to their terms and conditions. Please be aware of the following points:
- Microsoft does not claim ownership of the content you provide on the service. Your content remains your content. St Mary's University does not control, verify, or endorse the content that you and others make available on the service.
- You are reminded that St Mary's University requires that contributions must not consist of, or contain, illegal or offensive material; any material which is considered by the University to be illegal or offensive may be removed from the system. For this purpose the expressions illegal and offensive include (without limitation) material the publication of which is defamatory or would infringe copyright of a third party or which contravenes Data Protection legislation or the Telecommunications Act and material which constitutes incitement to racial hatred or which is offensive or obscene.